Migrating your Next.js application to appDir

Hi folks! 👋
Today I finally finished the migration of Next.js to the new router and the new experimental features of version 13. I've merged this PR that contains all the changes I've made to migrate my website to the new features. I have to admit: it was so funny to do it! 😄
The migration was not so hard, the beta documentation is really good and the core concepts are explained in a very clear way.
Next.js 13 introduced the new App Router built on top of React Server Components with support for layouts, nested routing, loading states, error handling, and more
Let's see what are the new features and how to migrate your application to the new appDir feature.
In this article, I will talk about:
The new App Router works in a new directory named app. The app directory works alongside the pages directory to allow for incremental adoption. This allows you to opt some routes of your application into the new behavior while keeping other routes in the pages directory for previous behavior. - Next.js documentation
One of the main changes with the new appDir is that by default, all the components inside app are React Server Components. This means that the components inside app will be rendered in the server and the client will receive the HTML generated by the server.
You can use the 'use-client' directive to render a component in the client only.
Before starting the migration, I recommend you to read the Next.js documentation about the new features and the migration guide to understand the changes.
Let's see some terminology used in the documentation:
- Tree: A convention for visualizing a hierarchical structure. For example, a component tree with parent and children components, a folder structure, etc.
- Subtree: Part of a tree, starting at a new root (first) and ending at the leaves (last).
- Root: The first node in a tree or subtree, such as a root layout.
- Leaf: Nodes in a subtree that have no children, such as the last segment in a URL path.
Let's the difference between the app and pages directories:
layout.jsThe layout is the root of the subtree. It is the first component that is rendered in the server and the client. It is the parent of all the other components in the subtree. It allows you to define the layout (header, footer, etc) of the subtree.
You can define a layout for all the subtree or for a specific route or a group of routes (tree, subtree, etc).
RootLayout.js, in this website I've defined aRootLayoutcomponent that is the parent of all the other components in the subtree. This component is defined in theappdirectory and it is rendered in the server and the client.... export const metadata = meta; export default function RootLayout({ children }) { return ( <html lang="en"> <head> <meta name="viewport" content="width=device-width, initial-scale=1" /> <meta name="author" content="mateonunez" /> <meta name="theme-color" content="#F59E0B" /> </head> <body className="antialiased"> <UIProvider> <MainLayout> <Suspense fallback={<Loading />}>{children}</Suspense> </MainLayout> </UIProvider> </body> </html> ); }
error.js- The error component is rendered when an error occurs in the subtree. It is the last component that is rendered in the server and the client.
- You can define an error component for all the subtree or for a specific route or a group of routes (tree, subtree, etc).
This file replaced my old
400.jsxand500.jsxfiles with a genericerror.jsfile.export default function Eror({ error, reset }) { useEffect(() => { console.error(error); }, [error]); return ( <> <div className={s.root}> <h2 className="title">Error unexpected. Can you fix me?</h2> <button onClick={() => reset()}>Try again</button> </div> </> ); }You can custom the error page for each subtree. For example, you can define a custom error page for the
blogsubtree and another custom error page for theaboutsubtree.loading.js- The loading component is rendered when the subtree is loading. It is the last component that is rendered in the server and the client.
- You can define a loading component for all the subtree or for a specific route or a group of routes (tree, subtree, etc).
export default function Loading() { return ( <div className="flex items-center justify-center h-screen"> <div className="w-32 h-32 border-b-2 border-gray-300 rounded-full animate-spin"></div> </div> ); }page.js- The page component is the last component that is rendered in the server and the client. It is the leaf of the subtree.
- You can define a page component for all the subtree or for a specific route or a group of routes (tree, subtree, etc).
- You can define a page component for a specific route or a group of routes (tree, subtree, etc).
With what we said earlier in mind, the structure of the new appDir begins to make a little more sense.
We have a layout that can be defined for all the subtree (or not), a loading component that is rendered when the subtree is loading, an error component, and a page component that is the leaf of the subtree.
The new appDir allows you to define a page component for a specific route or a group of routes (tree, subtree, etc).
For example, if you have a blog subtree, you can define a page component for all the routes inside the blog subtree. This page component will be rendered for all the routes inside the blog subtree.
// app/blog/page.jsx
export default function BlogPage({ children }) {
  return (
    <div className="flex flex-col items-center justify-center min-h-screen py-2">
      <main className="flex flex-col items-center justify-center w-full flex-1 px-20 text-center">
        <h1 className="text-6xl font-bold">Blog</h1>
        <p className="mt-3 text-2xl">My blog posts</p>
        {children}
      </main>
    </div>
  );
}

// app/blog/[slug]/page.jsx
export default function BlogPostPage({ children }) {
  return (
    <div className="flex flex-col items-center justify-center min-h-screen py-2">
      <main className="flex flex-col items-center justify-center w-full flex-1 px-20 text-center">
        <h1 className="text-6xl font-bold">Blog</h1>
        <p className="mt-3 text-2xl">My blog posts</p>
        {children}
      </main>
    </div>
  );
}
This is one of my favorite features of the new Next.js version. It allows you to define a metadata object for each subtree. This object is used to define the title, description, image, url, type, locale, site_name, twitter, and facebook of the subtree (or tree), avoiding external libraries or custom code.
This is an example of my default metadata object:
import config from './index';
const author = {
  name: 'Mateo Nunez',
  twitter: '@mateonunez95',
  github: '@mateonunez',
  email: 'mateonunez95@gmail.com',
  website: 'https://mateonunez.dev'
};

const defaultTitle = '@mateonunez';
const defaultDescription =
  "Hi folks! I'm Mateo Nunez, a Software Engineer from Colombia based in Milan. I ❤️ Open Source, JavaScript, the music, the food, the challenges and the continous improvement.";

const metadata = {
  title: {
    template: '%s | @mateonunez',
    default: defaultTitle
  },
  description: defaultDescription,
  keywords: [
    'mateo nunez',
    'mateonunez',
    'software engineer',
    'open source',
    'javascript',
    'nodejs',
    'react'
  ],
  author,
  authors: [author],
  colorSchema: 'dark',
  metadataBase: new URL(config.baseUrl),
  openGraph: {
    title: defaultTitle,
    description: defaultDescription,
    url: config.baseUrl,
    sitename: defaultTitle,
    images: [
      {
        url: 'https://mateonunez.dev/card.png',
        width: 512,
        height: 512,
        alt: 'Mateo Nunez'
      }
    ],
    locale: 'en_US',
    type: 'website'
  },
  icons: {
    icon: '/favicon-16x16.png',
    shortcut: '/favicon.ico',
    apple: '/apple-touch-icon.png'
  },
  themeColor: '#F59E0B',
  manifest: '/site.webmanifest',
  twitter: {
    card: 'summary_large_image',
    title: `${defaultTitle} on Twitter`,
    description: defaultDescription,
    creator: '@mateonunez95'
  },
  viewport: {
    width: 'device-width',
    initialScale: 1,
    maximumScale: 5
  }
};

export default metadata;
And this is an example of how to use it:
// app/layout.jsx
import meta from './metadata';

export const metadata = meta;

export default function RootLayout({ children }) {
  ...
}
The implementation of the metadata object inside the root layout means that all the subtree will inherit the metadata object until you define a new metadata object for a specific route or a group of routes (tree, subtree, etc).
// app/blog/page.jsx
import meta from './metadata';
export const metadata = {
  title: '> blog',
  description: `Articles written with ❤️ by ${meta.author.name} and the Community. ${meta.description}`,
  keywords: [...meta.keywords, 'blog', 'articles']
};

export default function Blog() {
  ...
}
It's also possible to generate dynamic metadata for a specific route or a group of routes (tree, subtree, etc) by using the generateMetadata function.
// app/blog/[slug]/page.jsx
export async function generateMetadata({ params }) {
  const { slug } = params;
  const { frontMatter } = await getArticle({ slug });

  return {
    ...meta,
    title: frontMatter.title,
    description: frontMatter.description,
    keywords: frontMatter.tags,
    openGraph: {
      title: frontMatter.title,
      description: frontMatter.description,
      type: 'article',
      article: {
        authors: [frontMatter.author.name],
        tags: frontMatter.tags,
        publishedTime: frontMatter.date,
        modifiedTime: frontMatter.date
      },
      images: [
        {
          url: urlJoin(config.baseUrl, frontMatter.image),
          alt: frontMatter.title
        }
      ]
    }
  };
}
Generating dynamic metadata is useful when you want to define a metadata object for a specific route or a group of routes (tree, subtree, etc) that depends on the route params.
The new API routes, or Route Handlers as they are called in the Next.js documentation, are a great way to create a REST API in a Next.js application.
The route handlers can be defined inside the app directory named route.js|ts and they are automatically exposed as API routes.
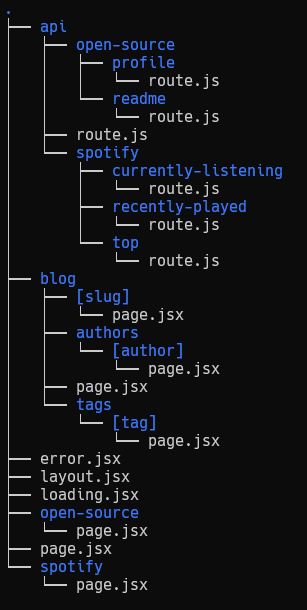
In my case I had all my API routes inside the api directory:
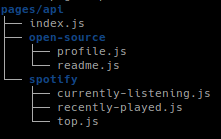
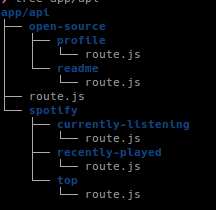
As you can note, I've created a subdir in the app directory just to keep the /api route. This is because I wanted to keep the same API routes structure as before but you can define the route handlers in the root of the app directory.
The main difference between the API routes and the route handlers is that the you need to export the method following the HTTP method name you want to use. In the old API routes you need to define the HTTP method inside the req object and expose the handle method as default. Furthermore, you can't expose other methods than allowed by the HTTP protocol.
The following HTTP methods are supported:
GET,POST,PUT,PATCH,DELETE,HEAD, andOPTIONS. If an unsupported method is called, Next.js will return a 405 Method Not Allowed response.
This is an example of how to define a route handler:
/app/api/open-source/profile/route.js
import { NextResponse } from 'next/server';
import { getProfile } from 'lib/github';
import { normalizeGithubProfile } from 'lib/utils/normalizers/normalizeGithub';

export async function GET() {
  const profile = await getProfile().catch(err => {
    return NextResponse.json(
      { message: 'Something went wrong with GitHub.', extra: err },
      { status: 500 }
    );
  });
  if (!profile) {
    return NextResponse.json({ error: 'Github not available' }, { status: 500 });
  }

  const profileNormalized = normalizeGithubProfile(profile);
  return NextResponse.json({ profile: profileNormalized });
}
This route handler will be exposed as /api/open-source/profile and it will be available for GET requests.
If you want to revalidate the data, you can return a
revalidateproperty from theGETmethod. The value ofrevalidateis the number of seconds after which a page revalidation is triggered.
export async function GET() {
  // ...
  return NextResponse.json(data);
}

export const revalidate = 60;
For full documentation about the route handlers you can check the official documentation.
I would have many things to say about the new system of rendering components both server-side and client-side. I recommend you to read the fundamentals about the new React v18 and Next.js 13 rendering system.
Simply put, there are two environments where your application code can be rendered: the server and the client.
All the components inside the app directory are RSC (React Server Components), introduced in v18 of React. When a route is requested with Next.js, the server will render the components allowing the client to take over the application and add interactivity, by asynchronously loading the client-side runtime.
With Server Compoments you can improve the performance of your application by delegating the rendering of the components to the server. The client-side JavaScript bundle size is reduced, cachable and predictable in size.
The client components are the components that are rendered only on the client-side. In Next.js they are prerendered on the server and hydrated on the client.
The
use clientdirective is a new way to to define the cut-off point where it crosses the boundary from the server-only to che client part. Oneuse clientis defined in a file, all the other modules imported into it, including child components, are considered part of the client bundle.
Rappresented in a diagram:

This is a simple example of a component that is rendered only on the client-side:
/app/components/Counter.js
'use client';

import React, { useState } from 'react';
import Button from 'components/Button';

export default function Counter() {
  const [count, setCount] = useState(0);

  return (
    <div>
      <p>You clicked {count} times</p>
      <Button onClick={() => setCount(count + 1)}>Click me</Button>
    </div>
  );
}
/app/components/Button.js
import React from 'react';

export default function Button({ children, onClick }) {
  return (
    <button
      onClick={onClick}
      style={{
        background: 'blue',
        color: 'white',
        padding: '10px 20px',
        border: 'none',
        borderRadius: '5px',
        cursor: 'pointer',
      }}
    >
      {children}
    </button>
  );
}
Note that:
- The
use clientdirective must be the first statement in the file. - The
use clientdoesn't need to be defined in every file. The client bundle is automatically created for all files that are imported into a file that has theuse clientdirective.
For full documentation about the use client directive you can check the official documentation.
I have to say that I'm really happy with the new Next.js 13 and React v18 rendering system. I think that the new app directory is a great improvement and it will allow us to write more maintainable and scalable applications. I'm really excited to see what the future will bring.
Next.js 13 is still in beta, so there are some things that doesn't work as expected or has different behaviors (caching, revalidation, etc). You can check the roadmap to see the current status of the new app directory.
I think that the migration to the new app directory is not so difficult. I hope that this article will help you to migrate your application to the new app directory.
If you have any questions or suggestions, feel free to text me on Twitter or check this repository on GitHub.
Bye! 👋